其实 rclone 挂载 Google Drive 网上的教程已经很多了,但是大多数的教程都有一点点过时,与现在的实际操作有一点出入,故整理了当前的挂载操作,以防忘记。
一、 安装并配置 rclone
首先在 vps 上一键安装 rclone:
curl https://rclone.org/install.sh | sudo bash
接下来在本地电脑上下载命令行操作的 rclone:
访问 rclone 下载地址,选择您的操作系统下载相应的 zip 包并解压。一会需要用得着。
软件准备好中,在 vps 上开始配置,执行:
rclone config
您应该会看见
2022/05/28 08:56:05 NOTICE: Config file "/root/.config/rclone/rclone.conf" not found - using defaults No remotes found, make a new one? n) New remote s) Set configuration password q) Quit config
选择 n,新建配置:
此时 rclone 会要你选择要挂载什么网盘,找到 google drive 并选择。
选择后 rclone 会要求输入 api token,如果留空会使用 rclone 默认的 api,但是据官方说明官方的目前使用人数过多,由于 google 本身的限制可能会出现需要等待时间过长的问题,因此推荐自己去申请一个 api。
申请 api 并不复杂,也不一定要是需要被挂载的 google 账户操作,随意一个正常的 google 账户就可以。下面是申请的简单步骤:
- 首先登录到 Google API console,创建一个应用,点击 “启用 API 和服务”,找到 Google Drive 并启用
2. 点击 OAuth 同意屏幕,用户类型选择外部,应用名称随便填写,比如 “rclone” 就可以。用户支持电子邮件和开发者联系邮箱都填写您自己的就可以,点击保存并继续,剩下的参数都是用默认就可以了。
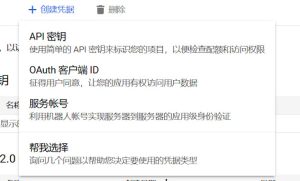
3. 点击凭据,屏幕上方点击创建凭据,选择 OAuth 客户端 ID
应用类型选择桌面应用。
名称随便填,点击创建。创建后会向您提供您的客户端 ID 和客户端密码,务必记下这些数据,并且填写到 rclone 中。
最后选择 OAuth 同意屏幕,选择发布应用。此时应该能看到发布状态变为了正式版。
至此 Google API 就申请完成了,继续返回到 rclone 中进行配置。
填写 Google API 后,应该会看到如下显示:
Scope that rclone should use when requesting access from drive. Choose a number from below, or type in your own value. Press Enter to leave empty. 1 / Full access all files, excluding Application Data Folder. (drive) 2 / Read-only access to file metadata and file contents. (drive.readonly) / Access to files created by rclone only. 3 | These are visible in the drive website. | File authorization is revoked when the user deauthorizes the app. (drive.file) / Allows read and write access to the Application Data folder. 4 | This is not visible in the drive website. (drive.appfolder) / Allows read-only access to file metadata but 5 | does not allow any access to read or download file content. (drive.metadata.readonly)
这个可以根据需求选择,比如我要完整的访问权限,就选择 1。
接下来
root_folder_id 为空,service_account_file 也为空,直接回车即可。
Edit advanced config 输入 n,不需要进行额外的高级配置。
Use auto config 因为是要在 vps 上挂载,vps 没有桌面环境,因此必须选择 n,进行远程配置。
选择后会看见如下显示:
Option config_token. For this to work, you will need rclone available on a machine that has a web browser available. For more help and alternate methods see: https://rclone.org/remote_setup/ Execute the following on the machine with the web browser (same rclone version recommended): rclone authorize "drive" "Your Token Code" Then paste the result. Enter a value.
注意,接下来要在本地执行,前面下载在本地的 rclone 压缩包解压后,你应该能看到一个 rclone.exe,类似下图
打开终端,进入到此目录后执行 rclone authorize “drive” 这一行。
如果不出意外,会自动打开浏览器进入到谷歌账号登录界面,此时一定要登录被挂载的谷歌账号,并选择同意授权。由于是新申请的 API,没有经过的谷歌的验证,所以谷歌会提醒该应用未经验证。但是左下角有一行小灰字,点击选择继续就能授权。
授权成功浏览器会提示 success。
此时返回命令行,等待几秒就能看见授权的 code 了。
复制授权 code,输入到 rclone 中。
接下来 rclone 会询问是否为团队盘:
Configure this as a Shared Drive (Team Drive)? y) Yes n) No (default)
如果您要挂载的就是团队盘,那么选择 y,不是的话就选择 n
此时配置就已经结束了,退出 clone,开始挂载。
二、 挂载 Google Drive
首先新建一个文件夹用于挂载:
mkdir /google
开始挂载:
rclone mount gdrive: /google --allow-other --allow-non-empty --vfs-cache-mode writes --daemon
其中 gdrive 是 rclone 配置时输入的配置名称,/google 是挂载目录,–daemon 是指后台运行。
此时可能会报错:
Fatal error: mount not ready
这是现在版本的报错不太完善,需要去掉 –daemon 才能看到报错
rclone mount gdrive: /google --allow-other --allow-non-empty --vfs-cache-mode writes
一般是因为缺少依赖导致的,我们选择安装
centos 系使用:
yum install -y fuse fuse3
debian 系使用:
apt install -y fuse fuse3
再次执行挂载命令,如果没有报错,就是挂载成功了。
检查挂载:
df -h
可以看到 /google路径说明已经成功挂载了。
接下来进入 /google 进行一些简单的测试
cd /google ls mkdir test rm -rf test
如果能够顺利执行,则说明挂载没有问题。


